
Transferring QuickBooks to a new computer might appear daunting, but it can be quiet and hassle-free with the proper suggestion. Whether elevating your hardware or changing to a different machine, maintaining your financial data is essential. This manual will walk you through the steps to efficiently transfer QuickBooks to a new computer.
Assuring uninterrupted entrance to your economic records and preserving the goodness of your data is essential for business continuity and peace of mind. Follow these steps carefully to make the change seamless and avoid troubles in your analysis processes.
Backup Your Company Files
Before you start transferring QuickBooks to another computer, keeping your QuickBooks company files safe is super important. It means backing up all your financial info so everything gets noticed during the switch. Here’s how to do it:
Open QuickBooks on Your Computer: First, ensure that QuickBooks can be discovered without any problems on the computer where all data is present.
Find the File Menu: Look for the “File” menu once QuickBooks runs. It’s usually in the corner at the top left of the screen. Click on it to see a menu of options.
Back It Up: In the “File” menu, you’ll find something called “Backup Company.” Move your mouse over that, and another menu will pop out. Click on “Create Local Backup” from this menu. It will kickstart backing up your company files on your computer.
Follow the Instructions: QuickBooks will then give you some instructions to follow. For example, it might ask you where you want to save the backup file.
Pick a Place: Select where you want to save the backup. It’s advisable to save your files on external storage devices like hard drives or USB sticks rather than solely on your computer. That way, you have a backup of your backup!
Set Things Up: QuickBooks might let you tweak some settings, like how much the file gets squished down (compressed) or if it gets locked up tight (encrypted). Adjust these based on what you want.
Save It: Once everything’s set up just right, hit the button to save your backup file. QuickBooks will help you through the rest of the steps.
![]()
Install QuickBooks on the New Computer
Install QuickBooks on your new computer after you’ve confirmed the security of your business files. You can use the installation DVD or download the files from the QuickBooks website. Here’s an easy manual to getting QuickBooks installed:
Prepare for Installation: If you have an official installation disc, insert it into the disk drive of your new computer. If you receive the files, download the installation from the QuickBooks website.
Follow the Instructions: After finishing the initial setup, follow the effortless steps on your screen. QuickBooks will help you through each step, so you won’t have to fear about making mistakes.
Activate QuickBooks: QuickBooks may ask for your product code to allow the software after installation. This code is like an entry to unlocking all of QuickBooks’s wonderful features, and it is usually included with your purchase.
Enter Your Key: If prompted, type your product key exactly as it’s given. It ensures that your QuickBooks software is legit and ready to go.
Restore Your Company Files
When QuickBooks functions properly on your new computer, let’s recover your company files from backup. This is how you do it:
Connect your external hard drive or find your backup: Connect to any external hard drives you used to save your backup. If it is saved somewhere else, such as a cloud service, ensure you can access it on your new computer.
Open QuickBooks: Start QuickBooks on your new computer. Make sure it’s prepared to go without any difficulties.
Navigate to the File Menu: Once QuickBooks starts, look to the top left of the screen. You’ll see a menu called “File.” Click on it to see a bunch of options.
Choose Open or Restore Company: In the “File” menu, there’s a choice marked “Open or Restore Company.” When you click on that, the new menu will appear.
Pick Restore a Backup Copy: Select “Restore a backup copy from the popped-out menu.” Once you’ve clicked on it, hit “Next” to proceed.
Locate Your Backup File: QuickBooks will prompt you to find your backup file. Choose “Browse” and navigate to your backup location. Once you’ve noticed it, click to choose it.
Follow the Prompts: QuickBooks will walk you through the rest of the process after choosing your backup file. Follow the screen directions, and your company files will be returned to their proper location before you notice it.
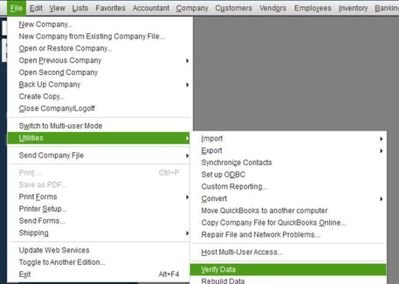
Verify Your Data
After you’ve returned your company files, it’s important to give them a once-over. Fire up QuickBooks and review your financial information to ensure everything’s spot on. Running reports or reconciling accounts can help you catch any hiccups during the transfer.
In this manner, you can be confident that your financial data is secure and ready for use on your new computer. It’s all about trusting QuickBooks to keep the data online and your mind at rest.
Update QuickBooks and Transfer License
Here’s how to make sure you’re up to date with the latest QuickBooks version and transfer QuickBooks to a new computer:
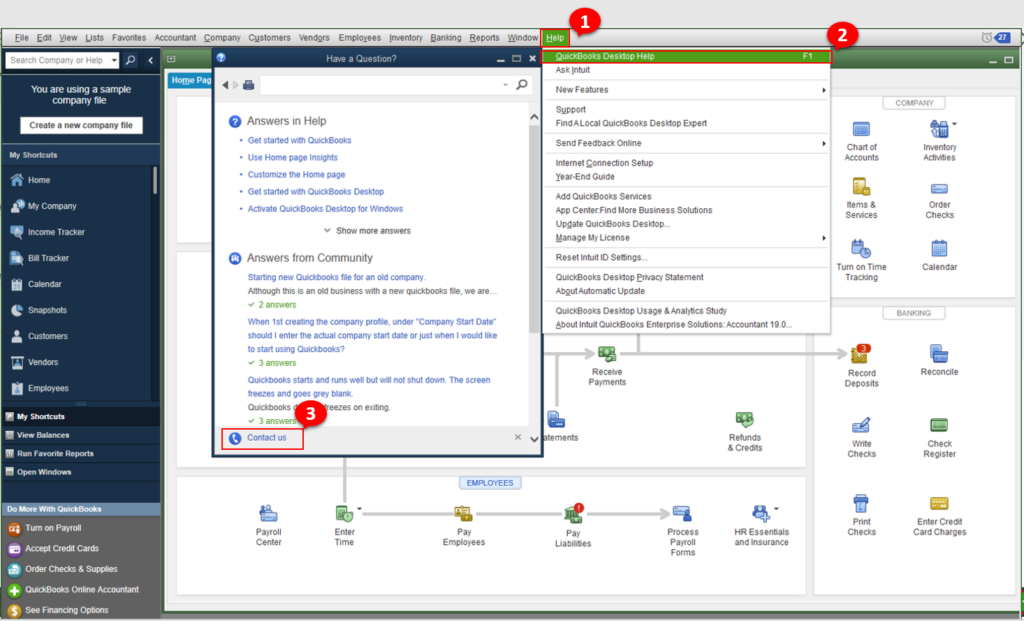
Open QuickBooks and select Help: Open QuickBooks from your PC. When opened, look for the “Help” menu in the top-right of the screen.
Update QuickBooks: In the “Help” menu, choose “Update QuickBooks.” It will explore for any public updates and show you through downloading and installing them. Keeping QuickBooks updated assures you of access to the newest qualities and improvements.
Manage Your License: After successfully editing QuickBooks, you must return to the “Help” menu and select the “Manage My License” option.
Transfer Your License: In the license managing section, select “Transfer License.” Read the on-screen instructions to delete QuickBooks from your old computer and start it on your new one. This will ensure a smooth transition of your license without any issues.
Step-by-Step Guide: Using a Portable Company File
Let’s break down the steps for using a portable company file to transfer QuickBooks to a new computer:
Creating a Portable Company File:
- Start by firing up QuickBooks on your current computer.
- Head to the “File” menu and hit “Create Copy.”
- Choose “Portable company file” from the options.
- Just follow the prompts QuickBooks gives you to finish making the portable file.
- Transferring the Portable File to the New Computer:
Once your portable file is prepared, move it to the new computer using an external drive or cloud storage. If you use an external drive, copy the movable file onto it. If you’re utilizing cloud storage, upload the file there.
Opening the Portable File on the New Computer:
- On your new computer, open QuickBooks.
- Go to the “File” menu and pick “Open or Restore Company.”
- Choose “Restore a portable file” from the options.
- Then, follow the instructions QuickBooks gives you to find and open the portable file from your old computer.
Step-by-Step Guide: Manual Transfer
Know how to transfer QuickBooks to a new computer utilizing an external drive with this step-by-step manual:
Copying QuickBooks Files to an External Drive:
- Start by finding your QuickBooks company files on your old computer. They usually reside in a folder called “QuickBooks” or “QB Data.”
- After you’ve viewed your firm files, select them all and copy them to your external drive. You can use a USB drive, an external hard drive, or another external storage device.
Transferring Files to the New Computer:
- Plug your external drive containing the copied QuickBooks files into your new computer. Make sure your new computer recognizes the external drive.
- Now, find the right directory on your new computer where you want to put the QuickBooks files. It is typically where QuickBooks is installed or where it expects to find company files.
- Paste the copied QuickBooks files from your external drive into the chosen directory on your new computer. This action moves the files from the external drive to your new computer’s storage.
Opening QuickBooks on the New Computer:
-
- Go to the location where you pasted the QuickBooks files. It is often within the QuickBooks program files or a designated company files folder.
- Double-click on the company file you desire to work with in QuickBooks. QuickBooks will open up and prepare you to access and manage your financial data on your new computer.
Step-by-Step Guide: Using Intuit Data Protect
Let’s walk through how to set up Intuit Data Protect and use it to move your QuickBooks data to a new computer:
Setting up Intuit Data Protect:
Start by installing Intuit Data Protect on both your old and new computers. You can download the software from the Intuit website or use the provided installation files. Once the download is complete, follow the setup suggestions to install Intuit Data Protect on each computer. It’s usually a point of running the installer and following the steps on your screen.
After installation, it’s time to set up Intuit Data Protect. Log in with your Intuit account details. You’ll be instructed to make one if you don’t have one. After logging in, you can customize your backup options with the help of the setup wizard. You can select the frequency of backups, choose which files to include, and decide where to save them, whether on an outer drive or in the cloud.
Transferring Data Using Intuit Data Protect:
Now that Intuit Data Protect is ready to roll on both computers, it’s time to start the data transfer. Open Intuit Data Protect on your old computer and go to the backup settings. Follow the instructions provided by Intuit Data Protect to start a backup of your QuickBooks data.
Pick which files or folders to back up and where to stash the backup. Once the backup’s finished, you can restore it to your new computer using Intuit Data Protect. Fire up Intuit Data Protect on your new computer and follow the steps to return the backup from wherever you saved it.
Intuit Data Protect will guide you through the process, ensuring your QuickBooks data moves securely and without hiccups.
Conclusion:
Pushing QuickBooks to a new computer is simple if you follow these steps: First, back up all your company files. Then, install QuickBooks on the new computer. Next, restore your data onto the new device and double-check that you examined everything correctly.
Please update your software to the latest version to ensure optimal performance. Keep your development key and license details handy to provide a soft activation procedure. With these steps, QuickBooks will be up and running on your new computer quickly.
Frequently Asked Questions
[sp_easyaccordion id=”2370″]