
Window films are helpful because they help relieve unwanted glow and provide privacy in your room. However, when it’s period to remove the old, peeling film, it can appear like a daunting task. But do not worry! With the correct procedure, you can remove the window film.
In this guide for beginners, we’ll explain step-by-step how to remove window film without any trouble. Just follow these simple instructions, and soon, your windows will be clear and accessible to any film, making your space look fresh and bright again.

Why Window Films Are Important
Window films are essential in enhancing indoor environments’ operation and comfort. Mainly, they serve as a border to preserving privacy and protecting interiors from snooping eyes while allowing great natural light to brighten the room. Furthermore, by minimizing glow, window films create a more facilitative environment for various activities, whether working diligently or relaxing peacefully.
Another advantage is their capacity to regulate room temperature by stopping harmful UV rays, thus reducing the reliance on artificial cooling techniques and potentially clipping down utility costs. In essence, window films present many advantages, including improved comfort, enhanced privacy, and increased energy efficiency, making them essential additions to any indoor setting.
Reasons to Remove Old Window Film
Peeling or Bubbling
When you notice the window film starting to peel or produce bubbles on the glass surface, it’s time to consider removing and replacing it. These symbols not only detract from the aesthetic charm of your windows but also show a decline in the film’s functionality.
Peeling or bubbling film can compromise its ability to provide privacy, reduce glare, and block UV rays effectively. Moreover, imperfections may worsen if left unaddressed, leading to further deterioration. By promptly handling these issues and returning the window film as needed, you can keep clear, functional windows that improve the aura of your space.

Discoloration
As time passes, window film might change color because it’s been out in the sunlight or dealt with other things in the environment. This color change can make your windows look less friendly and tell you it’s time to replace the film. When window film becomes discolored, it loses attraction and might not do its job either.
This discoloration isn’t just a decorative issue; it can also affect the film’s version. So, when you notice your window film changing color, it’s a warning that it’s no longer doing its job effectively and must be returned to support both the aesthetic charm and functionality of your windows.

Decreased Privacy or Glare Reduction
When your window film doesn’t give you enough privacy or protect against glare like it used to, it’s probably worn out and needs replacing. As window film gets older, it doesn’t work either, so it won’t keep your space private or shield you from glare like before.
When you notice this occurring, it’s a sign that it’s time to change out the old film for a fresh one. Doing this lets you confirm that your windows restart to offer the privacy and comfort you require for your home or office.

Visible Damage or Wear
If you see scratches or cracks on your window film, it’s time to replace it. Also, if the film looks worn or faded, consider getting a new one to freshen up your windows. These damages affect how your windows look and how well the film works. Replacing the old or damaged film can make your windows look better and work better.

Gathering Your Tools
Before you dive into removing your window film, gather the following tools:
Scissors or Razor Blade
Use scissors or razors to remove window film. These instruments are essential for creating initial cuts on the film, allowing you to create a starting point for peeling it off. Carefully cut the movie with scissors or a razor blade to promote removal. Are you looking for “How To Remove Brown Stains From Teeth Naturally”. Explore our comprehensive guide for safe and efficient methods.
Spray Bottle
Fill a spray bottle with warm, soapy water to ready for removing window film. This solution helps reduce the glue, making skin off the film more accessible. The warm water helps to dissolve the glue, while the soap delivers extra lubrication for smoother disposal. With the spray bottle prepared, you can dive into the task.
Plastic Scraper or Knife
A plastic scraper or knife is handy for delicately lifting window film from the glass surface. Its flat, smooth edge helps to loosen the film without causing damage to the glass. You can effectively separate the film from the glass by gently maneuvering the scraper or knife along the edges, facilitating its removal process efficiently.
Microfiber Cloth
Use a microfiber cloth to clear any remains after removing window film. This smooth and porous fabric is ideal for gently brushing away any adhesive remains or residue on the glass surface. Its fine fibers remove residue without rubbing or damaging the glass, returning a clean and smooth finish.
Step-by-Step Removal Process
Follow these steps to remove window film:
- Prepare the Window
- Cut the Film
- Peel the Film
- Use the Scraper
- Clean the Glass
- Final Touches
- Heat Method

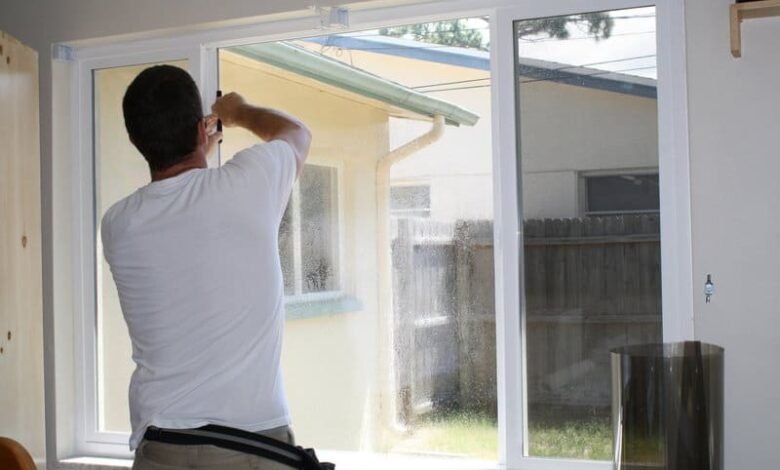
Prepare the Window
To remove the window film, you should well spray warm, soapy water onto the film. It’s an essential phase since it softens the glue, quickly removing the film from the glass. Warm water softens the paste, and soap works as an oil, making it easier to peel the film off. Simply wetting the window film with the soapy water solution ensures it is sufficiently relaxed and ready to be removed without inducing damage to the window.
Cut the Film
You must utilize a plastic scraper or putty knife to remove window film effectively. These tools are instrumental in gently lifting the film from the glass surface. Their flat, silky edges allow for an effortless break of the film without causing damage to the glass.
By carefully manipulating the scraper or knife along the borders of the film, you can loosen it from the glass, making the removal process more painless. With the help of these tools, you’ll be able to drag the window film efficiently and without any hassle, exiting your windows clean and clear.
Peel the Film
To effectively remove window film, peeling back one corner of the film is essential. Take your time during this procedure and work slowly to control ripping the film or leaving residue behind on the window surface. By moving cautiously, you can ensure that the film is removed purely and without damaging the window.
Use the Scraper
If the window film is difficult to remove, gently pull a plastic scraper or putty knife away from the glass. Use mild pressure to avoid damaging the glass. Additionally, you can spray more water onto the film to keep the adhesive moist, making it easier to remove. Following these procedures, you can remove tenacious window film without damaging the glass surface.
Heat Method
The “heat method” is a technique for removing window film using warmth. It involves warming the film using a heat gun or hairdryer. The warmth helps to soften the adhesive that attaches the film to the window, making it more straightforward to peel off.
If you heat the film gently and peel it away slowly, you can remove it without harming the glass or leaving any residue. Many people prefer the heat method for removing window film because it’s effective, especially when done cautiously and patiently. It’s a clever way to restore the appearance of your windows without causing any harm.
Clean the Glass
After successfully removing the window film, take a microfiber cloth to wash the glass cover and eliminate any remaining adhesive residue. It would help if you exerted some force on stubborn places while brushing. The soft surface of the microfiber cloth ensures that the glass remains scratch-free during the cleaning procedure.
By meticulously brushing the glass, you’ll repair its clarity and smoothness, leaving behind a clean finish. This last step ensures your windows remain free from the film, enhancing their build and functionality.
Final Touches
For completing touches, use a glass cleaner to brush down the window and gain a crystal-clear finish. It releases any remaining residue or spots, leaving the glass sparkling and clean. You can use a soft motion with the glass cleaner and a clean cloth to ensure the window is free from any spots or marks.
This final wipe-down adds a shiny look to the window, improving its appearance and allowing natural light to brighten the space without obstacles.
Conclusion
Removing window film can be straightforward with the right tools and methods. Bid farewell to the worn-out, peeling film and welcome clear, unobstructed views into your space. Remember to proceed at a steady pace, exercising patience throughout the process.
With each careful step, you’ll notice improvements in the appearance of your windows. Before you know it, your windows will recover their new condition, showing a fresh perspective and improving the general air of your surroundings. Following these easy guidelines and keeping a patient perspective, you’ll gain satisfying results without hassle or stress.
FAQs
Is it hard to remove window film when it's cold outside?
It can be more challenging in cold weather because the film gets stiff. It's better to wait for warmer weather or use something warm like a hairdryer to soften the movie before taking it off.
Could I accidentally mess up the window frame while removing the film?
You can avoid damaging the frame if you're careful and use the right tools. Just go slow and be gentle.
Are there ways to remove window film that are good for the environment?
You can try things like steam or natural solvents made from citrus fruits. They work well and are safer for the environment than harsh chemicals.
Will removing tinted window film modify the tint on my windows?
The tint could fade or get messed up, but if you're careful and use gentle methods like heating the film, you can usually keep the tint looking good.